 |
WP Enthusiast and WP Professional hosting accounts can use this tutorial if the Email Add On has been enabled.
|
Follow the steps below to set-up an automated response for when you are out of the office or on vacation.
 |
Note that you must log in to your hosting account for this tutorial, not your email account.
For information about setting up an out-of-office response from your email account, see your email client's documentation.
|
Choose the tutorial that reflects your ACC interface type:
Not sure what the difference is? See Which ACC Interface Am I Using?
If you are using the Legacy Interface:
- Log into your web hosting account at my.pair.com.
- In the left sidebar, click E-Mail
- In the drop-down, click New Recipe
- Choose whether you want an auto-response message for A single e-mail address or All e-mail addresses for this domain name
| If you select a single e-mail address |
If you select A single e-mail address, input the beginning of the email address and then select its domain from the corresponding drop down |
| If you select all e-mail addresses for this domain |
If you select All e-mail addresses for this domain, select the domain name from the corresponding drop-down menu
This will cause ALL emails addresses within this domain to send auto-response messages.
|
- Under the Recipe Type section, select Autoresponder
- Click the Proceed button
- On the next page, confirm you have selected the correct Recipient E-mail Address and Recipe Type
- Fill in the following fields:
| Name |
This will be displayed as the sender of the auto-response email. |
| From E-Mail Address |
This will be displayed as the sending email address. Replies to the auto-response email will be delivered to this address. |
| Subject |
This will be displayed as the Subject header of the auto-response email. |
| Autoresponder Message |
This will be the body of the auto-response emails.
You may want to include the dates of your absence in the auto-response message.
|
| Limit Autoresponse Frequency |
Use this option to limit how often each sender may receive your auto-response message. This MUST be checked if you want to use the Only Respond Every feature.
|
| Only Respond Every |
Here you can input how often the auto-response will be sent out.
For example, if the auto-response is set only to respond every 1 day and johndoe@example.com sends you three emails in one day, he will only receive one auto-response message from you.
You may want to limit frequency in case someone sends you multiple emails in a day.
|
- Check the Date Range box
- Click the empty field next to Start Date. Use the calendar drop down to schedule a start date for the auto-response to go into effect
- Click the empty field next to End Date
Use the calendar drop down to schedule an end date for auto-response to stop
- If you don’t set an end date, the auto-response will be in effect until you delete the recipe.
- When you are finished filling in the fields, click Create Autoresponder to create your auto-response message.
|
Responses will begin at 12 AM on the selected date.
|
Congratulations! Your out-of-office/vacation message auto-response is now set-up. It will take effect at 12 AM of the start date you selected.
 |
If you do not select an end date for your auto-response, the auto-response will continue until you remove it. See Deleting a Email Recipe.
|
If you are using the New ACC Interface:
-
Log into your web hosting account at my.pair.com.
-
In the top navigation bar, click Email
-
Click the New Recipe button
-
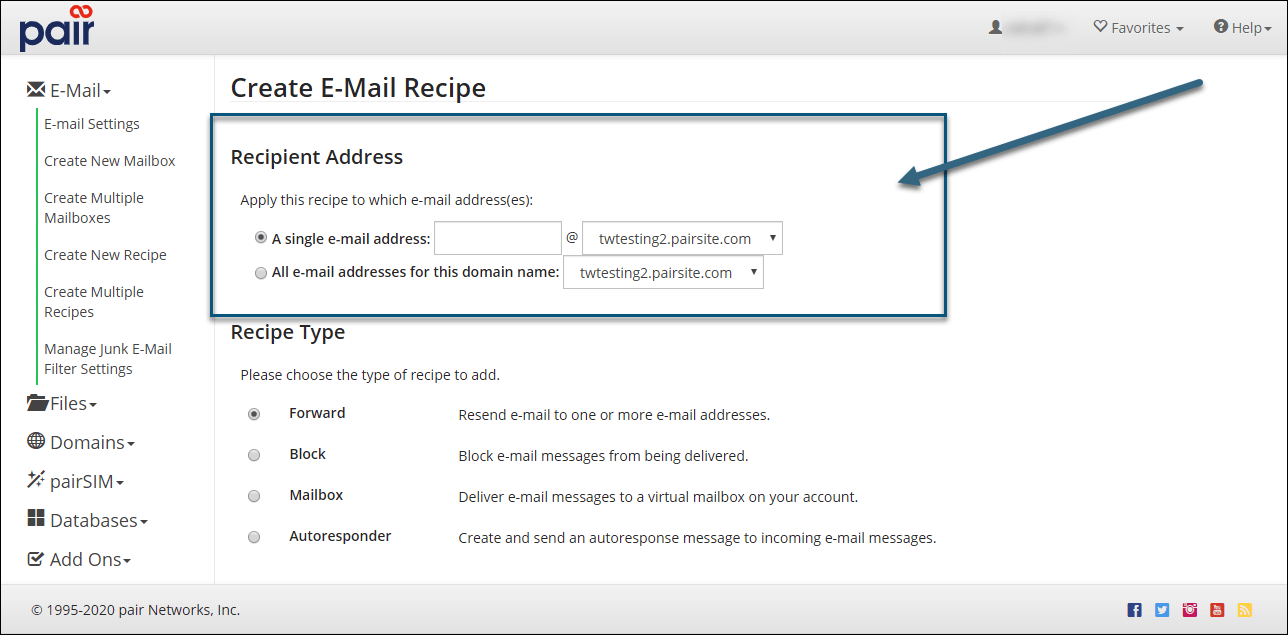
In the “Recipient Address” section, select between:
| A single email address |
This will apply the recipe to a single email address. Use the text field and drop-down to input your chosen email address. |
| All email addresses for domain |
This will apply the recipe to all email addresses on a domain name. Use the drop-down to select a domain.
If you select this option for an Autoresponder recipe, this will reroute all email addresses to another mailbox.
|
-
In the “Recipe Type” section, select Autoresponder
-
Click the Proceed button
-
Fill in the following fields:
| Name |
The automatic response will use this name in the From: header.
|
| From E-Mail Address |
The automatic response will use this email address in the From: header.
Replies to the autoresponse email will be delivered to this address.
|
| Subject |
The autoresponse will use this as the Subject: header of the email.
|
| Autoresponder Message |
The autoresponse message will use this as the body of the email. |
| Limit Autoresponse Frequency |
Use this option to limit how often each sender will receive your autoresponse message. This MUST be checked if you want to use the Only Respond Every feature.
|
| Only Respond Every |
Note: The Only Respond Every option is only available if the Limit Autoresponse Frequency option is toggled on.
Use this field to limit the amount of autoresponses a sender may receive in a given time frame.
For example, if the autoresponse is set only to respond every 1 day and johndoe@example.com sends you three emails in one day, they will only receive one autoresponse message.
|
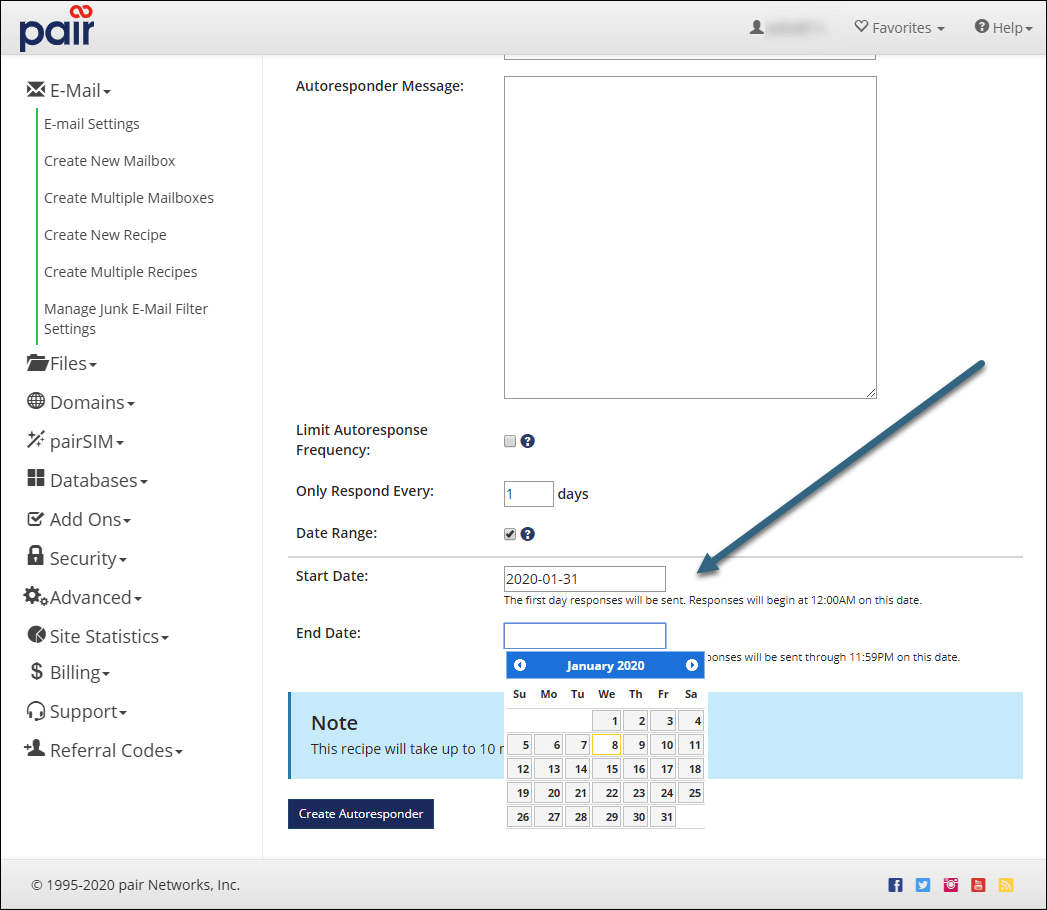
| Date Range |
Toggle this option on if you want the autoresponse in place for a certain time frame.
If toggled on, set the:
-
Start Date: Enter the date you want the autoresponse to take effect. Responses will begin at 12:00AM on this date.
-
End Date: Enter the date you want the autoresponse to end. Responses will be sent through 11:59PM on this date.
You can either write the dates in using the mm/dd/yyyy format or you can use the calendar to select the dates.
|
-
Click the Create Autoresponder button to create your autoresponse message.
Congratulations! Your out-of-office/vacation message autoresponse is now set-up.
|
If you do not select an end date for your auto-response, the auto-response will continue until you remove it. See Deleting a Email Recipe.
|
